Call Us

We are ready to help

Request a special version

Didn't find what you were looking for?
This field cannot be empty.
This field must be at least 3 characters long.

Files

Drag & Drop files here or click to browse

File format supported: (.pdf, .zip, .docx, .png, .jpg .xlsx, .xls, .csv, .txt) & Max Filesize: 25mb

Need to be uploaded up 1 to 3 files.
File format supported: (.pdf, .zip, .docx, .png, .jpg .xlsx, .xls, .csv, .txt) & Max Filesize: 25mb
Leave your details so we can contact you
This field cannot be empty.
This field must be at least 3 characters long.
This field cannot be empty.
Please enter a valid email address.
This field cannot be empty.
Please enter a valid phone number.
This field cannot be empty.
Server error. Try again later.
Thank you!
We will send you a confirmation email and will contact you soon.
Don't have account yet? Register
Back to shopping

Structure and function of force/torque sensors

Introduction

With the 6D multi-component sensors from ME-Meßsysteme GmbH, it is possible to measure forces and moments in the three spatial dimensions (x, y, z). This article presents various designs of force/moment sensors.

As with one-dimensional force or torque sensors, deformation bodies made of high-strength spring steel or high-strength aluminum are used, equipped with strain gauges as the measuring element.

Strain Gauge Technology

Strain gauge technology has proven effective for converting mechanical deformation into electrical measurements in force and torque sensors.

Metal foil strain gauges are most commonly used. These metal foil strain gauges are characterized by excellent linearity and very low hysteresis. The metal foil is matched to the coefficient of thermal expansion of the deformed body: The thermal expansion of the deformed body is compensated by a corresponding – negative – temperature coefficient of resistance. This so-called self-compensation supports the actual compensation of thermal drift through the application of a Wheatston bridge full or half bridge circuit.

By using a full bridge strain gauge and the established compensation circuits, individual components of the three forces and torques can be selectively isolated from one another. Additionally, the full bridge strain gauge offers the highest output signal and the best compensation for temperature-induced drift compared to half or quarter bridges.

The design of the deformation body offers further possibilities for separating the load components, e.g., through (isotropic or anisotropic) spring joints and parallel guides.

The design of the deformation body determines the measuring range of the force/torque sensor.

Solid or hollow cylinders

Design No. 1

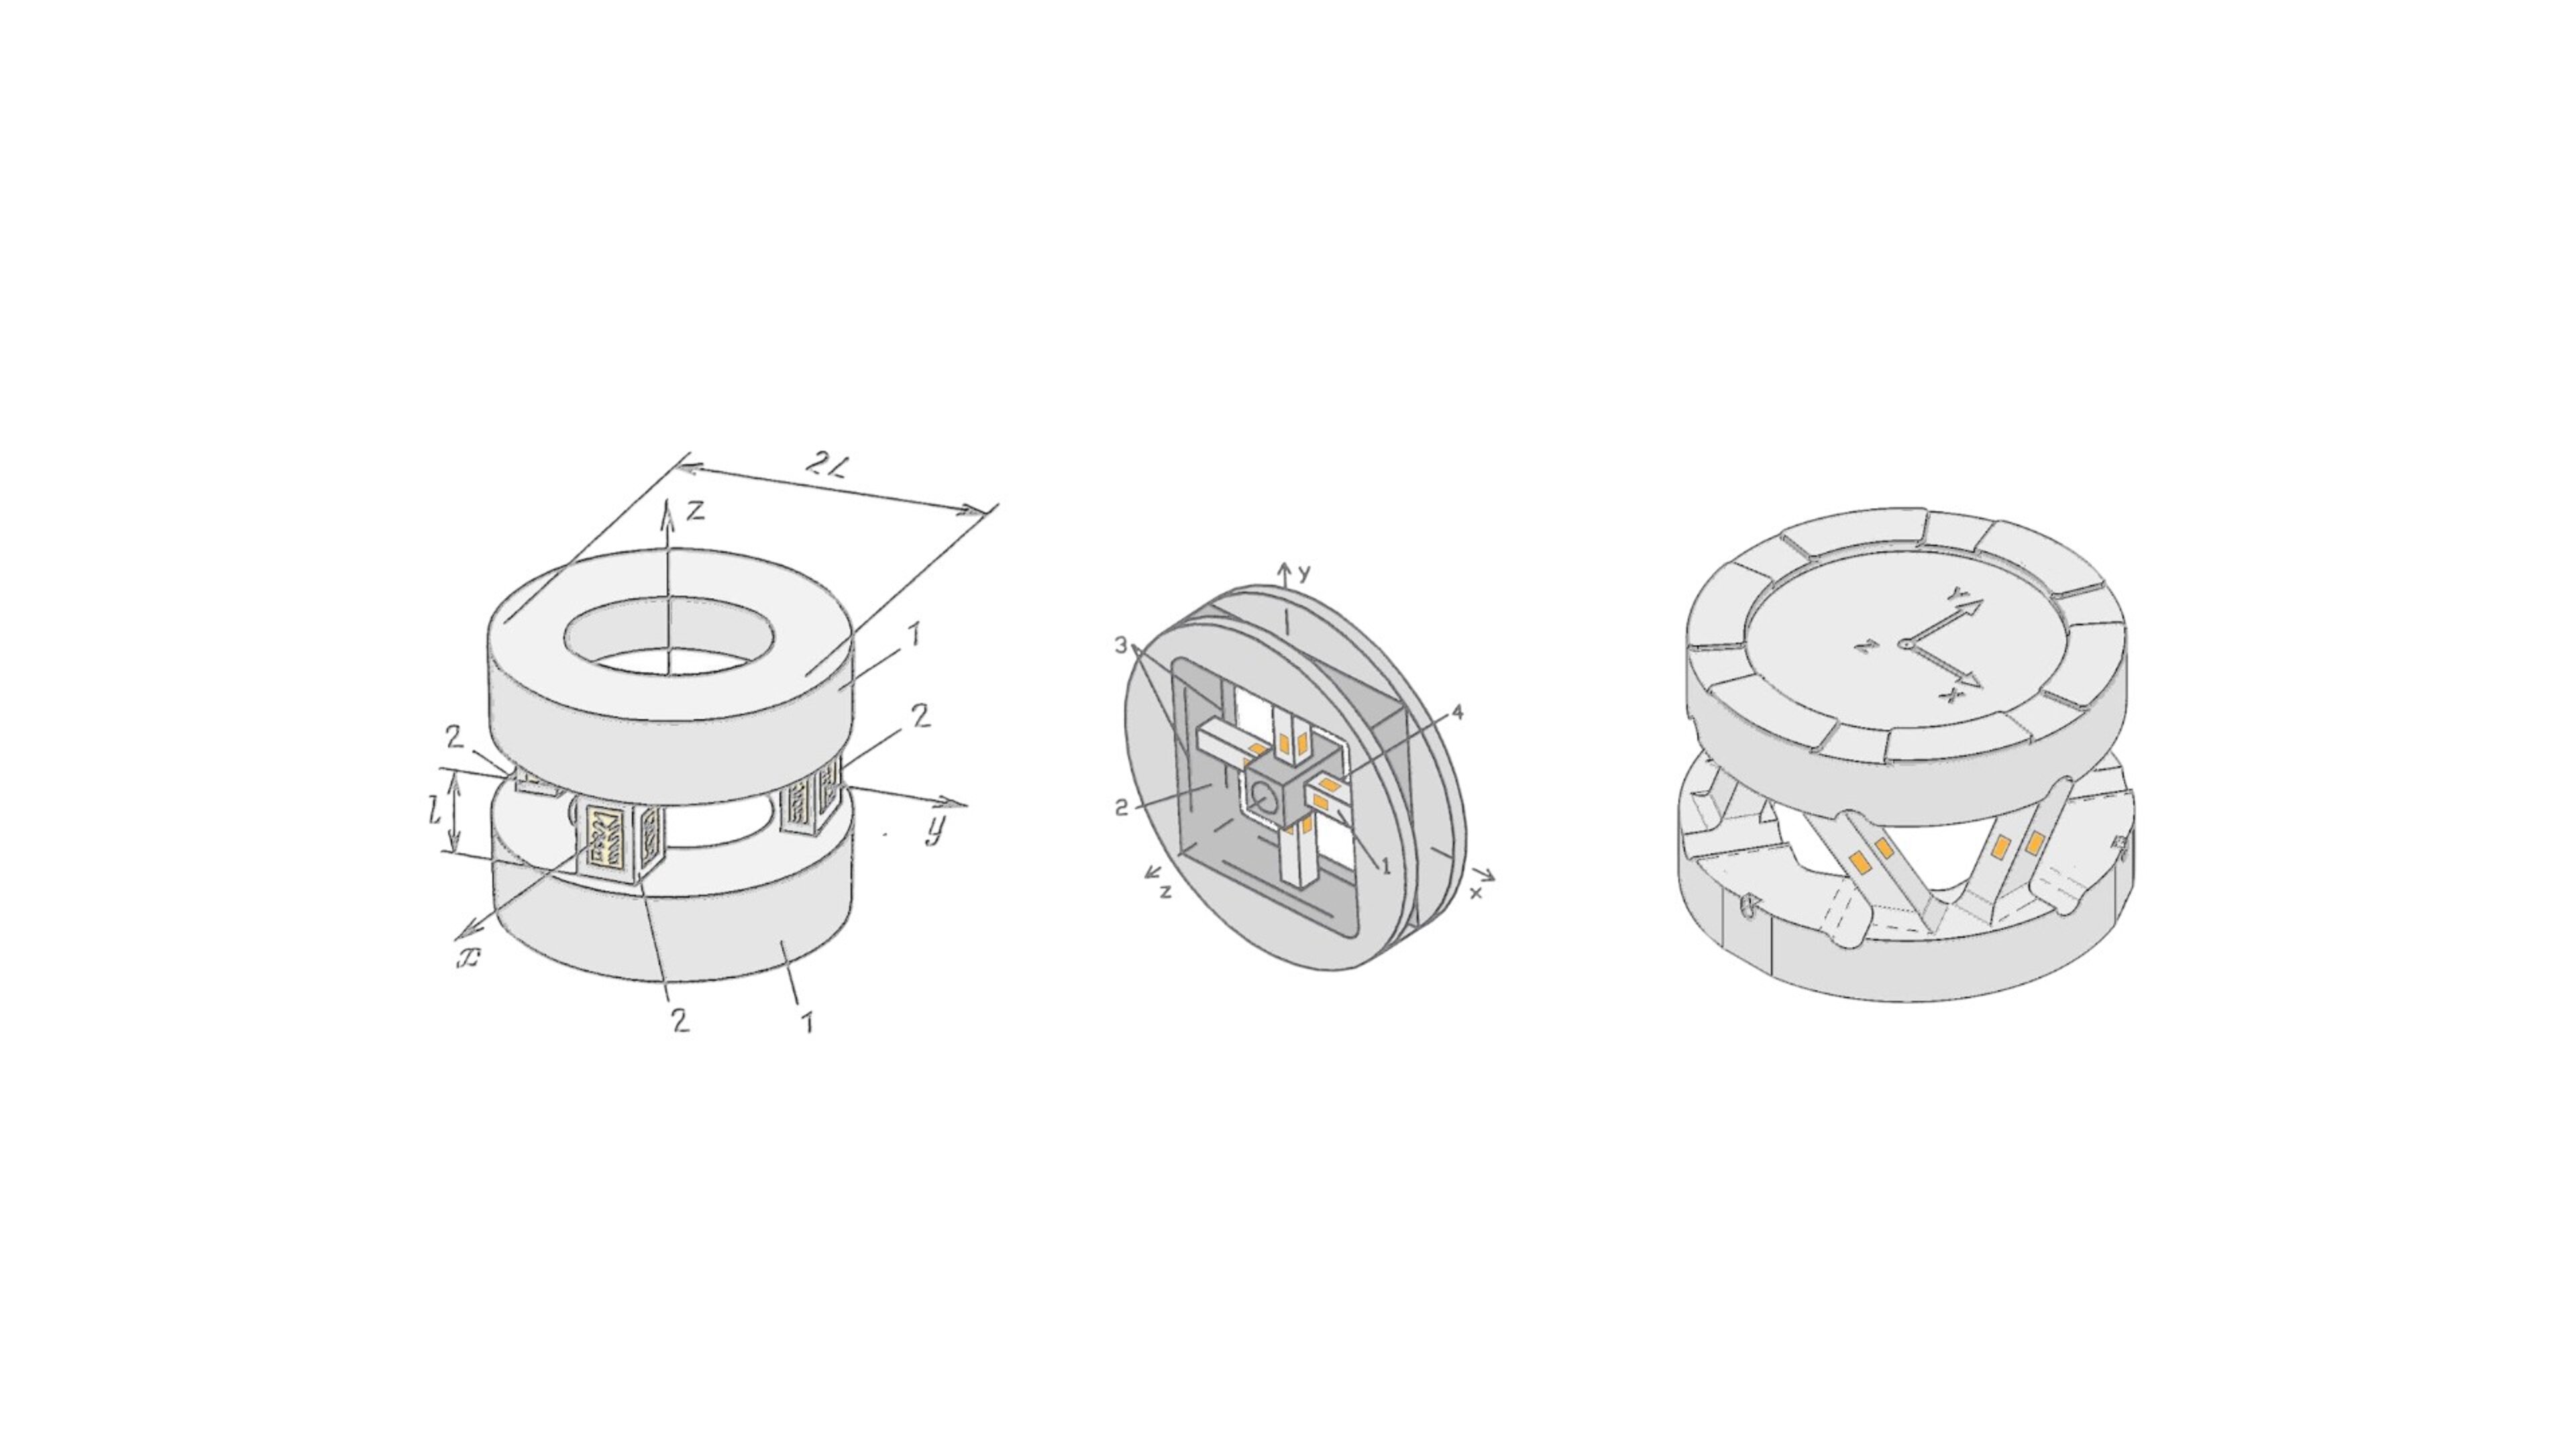
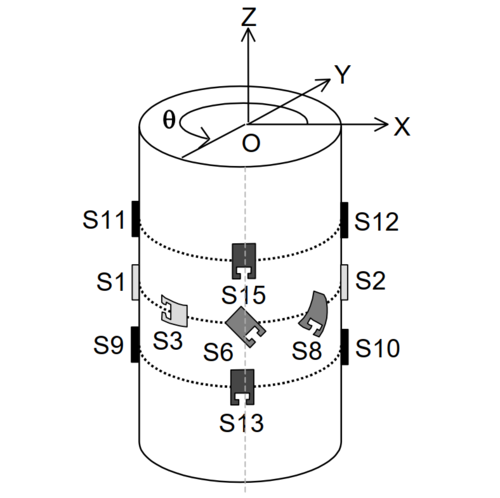
By applying known strain gauge circuit techniques, six strain gauge full bridges are realized, each assigned to one of the six load components. The design described in [1] could be extended by switching from "simple" full bridges with opposing grids to "double full bridges" in series or parallel connection with a cylinder cover every 90 degrees around the circumference.

Tripod (vertical)

Design No. 2

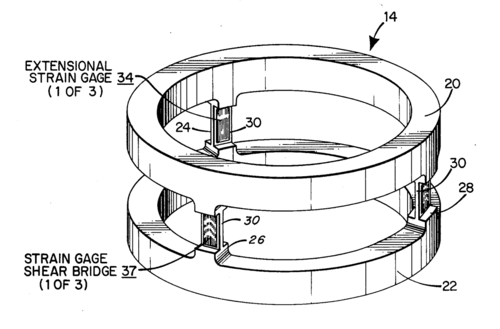
While in design no. 1 each measuring channel corresponds exactly to one load component, patent [2] describes a "tripod" with 3 vertical columns. Each column is equipped with two different measuring grids: a shear grid +45/-45° as a half-bridge on the outside, and a longitudinal grid on the inside. The shear grids provide (different) signals for torsional moment, Mz, and radial forces Fx and Fy. The longitudinal grids provide (different) signals for Fz, Mx, and My.

4-column (vertical)

Design No. 3

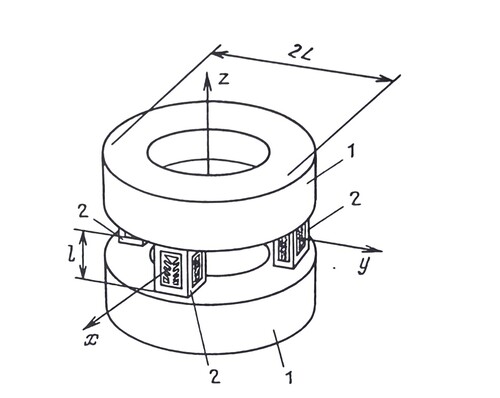
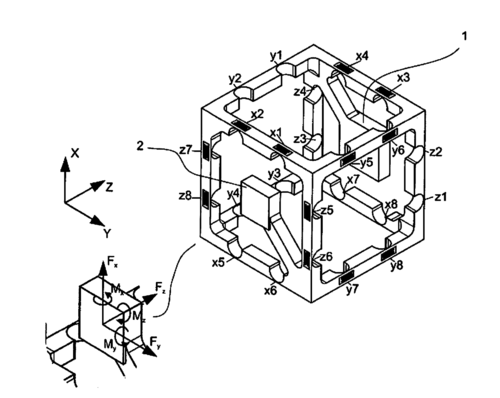
The "4-column" design from [3], [4] is used for high-precision 1D force sensors, as well as for 2D force/torque sensors, 3D force sensors, and 6D force/torque sensors. By equipping the four columns with full bridges, each measurement channel can be assigned precisely one load component.

The measurement ranges can be adjusted by selecting the column cross-section, diameter, and length.

4 columns (planar)

Design No. 4

The 4-column design can also be implemented as a planar structure [3], [4]. As in design no. 3, the columns are equipped with full bridges. This design is particularly suitable for MEMS (Micro-Electro-Mechanical Systems). In this case, the deformation body is etched from silicon, for example, and strain gauges are implemented either as semiconductor strain gauges by doping or as metal foil strain gauges by vapor deposition or sputtering.

MEMS 6DOF Sensors 

MEMS can only be implemented for very small forces and moments on the order of 1 N, 1 Nm. For manufacturing reasons, typically only one of the four surfaces of the bending elements in a MEMS is equipped with strain gauges. This results in greater crosstalk compared to fully equipped bending elements.

Hexapod (Stewart Platform)

Design No. 5

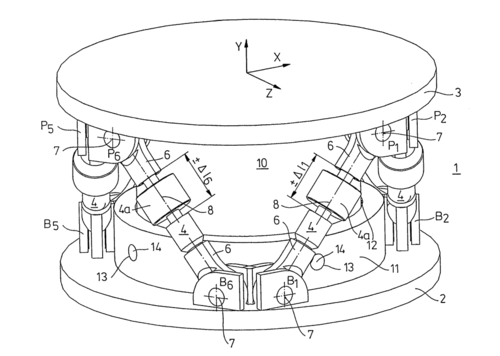
Patent [5] from 1994 describes a Stewart platform equipped with six axial force sensors. Force sensors are used instead of actuators. A disadvantage for the sensors is the joints, which can lead to undesirable play in a force/torque sensor. The idea of ​​the Stewart platform was already described in patent [6] from 1983. In that patent, the joints are omitted in favor of a more compact design.

Variants of the hexapod

The hexapod is used in various configurations as a deformation body for force/moment sensors. The joints can be replaced, for example, by solid-state joints. The influence of bending moments can also be compensated for by strain gauge bridge circuits. For very large measuring ranges above 100 kN, the bending moments are compensated for by additional strain gauges or measuring channels.

Measuring cube


Design No. 6

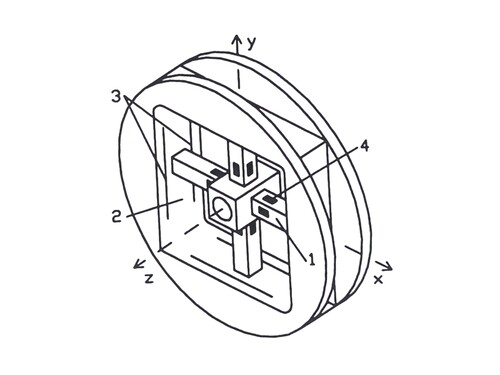
The measuring cuboid described in patent [7] consists of three orthogonally arranged double beams connected in series, each spanning a cube face.

Opposite cube faces are mechanically connected in parallel and measure the force along the same coordinate axis. The evaluation of these force pairs is used to determine the moments.

Alternative design to the measuring cuboid

The design of the "measuring cuboid" is similar to the parallel connection of two series-connected 3D force sensors (K3D35, K3D60a) at a defined distance. The distance between the 3D sensors can be varied to scale the measuring range for measuring moments.

By connecting two 3D force sensors in parallel, each individual sensor is relieved of bending moments, thus increasing accuracy.

A (far too rarely) used technique for wind tunnel balances involves arranging two 3D force sensors outside the wind tunnel, connected by a rigid element that supports the model.

Comparison of design variants

A comparison of the design variants reveals fundamental design principles.

  • Compensation circuits with strain gauges,
  • Parallel connection of spring elements (parallel kinematics),
  • Series connection of spring elements (series kinematics).

By varying and combining these principles, it is possible to design the optimal force/torque sensor for the respective application.

Design No. 1 primarily utilizes the proven strain gauge compensation circuits.

Designs No. 2 to No. 5 are parallel kinematics. All spring elements are connected in parallel.

Design No. 6 is a series kinematic with respect to the measurement of the three force components. Each double beam for a force component is supplemented by another double beam in parallel connection to measure the moments caused by a force couple with a defined distance.

All three design principles solve the common problem of separating the components [Fx, Fy, Fz, Mx, My, Mz] of a load vector.


Evaluation of the variants

Advantages of parallel connection

Designs with parallel-connected spring elements generally exhibit a higher pitch than designs for a comparable load range using series connections. This also translates to higher dynamics for the parallel connection. Furthermore, errors due to positional or angular deviations can accumulate in series connections. Parallel connections typically allow for more compact designs.

Disadvantages of parallel connection

The mathematical models for real parallel circuits are complex, especially when, for example, multiaxial stress states arise due to missing joints or flexible support and clamping conditions for the spring elements.

Advantages of series connection

Each individual axis can be optimized independently of subsequent axes. Likewise, the mathematical model is easy to create. The large measuring range offers an advantage with force-compensated sensors that use an actuator to compensate for the deflection. 

Disadvantages of series connection

Due to the series connection (of measuring springs), the spring travels add up, and the stiffness of a force/torque sensor in series is lower compared to one in parallel. The first of the six series-connected spring elements must also absorb the greatest lateral forces and moments, resulting in the greatest crosstalk at this spring element. The spring stiffness of the sensor differs in each measuring axis.

Variants with three spring elements

Variants with three spring elements are used in two different designs:

  • as a spatially constructed tripod
  • as a planarly constructed tripod.

Both variants involve a parallel connection of spring elements. Both variants require at least two Wheatstone bridge circuits per spring element, which are designed to respond sensitively to two mutually perpendicular load cases and to compensate for the other load case particularly well.

Variants with four spring elements

Similar to the variants with three spring bodies, each spring body must be equipped with two Wheatstone bridge circuits.

[1] Dae-Im Kang, Hong-Ho Shin, Jong-Ho Kim and Yon-Kyu Park: "Design and Analysis of a Column Type Multi-Component Force/Moment Sensor". Proceedings of the 17th International Conference on Force, Mass, Torque and Pressure Measurements, IMEKO TC3, 17-21 Sept. 2001, Istanbul, Turkey

[2] Paul C. Watson, Samuel H. Drake: "Method and Apparatus for Six Degree of Freedom Force Sensing". US Patent No. US 4094192, 1978.

[3] D. Grinevsky, A. Formalsky, A.Schneider: "Force Control of Robotics Systems", CRC Press LLC, 1997.

[4] Weiler. "Handbuch der Kraftmesstechnik", ...

[5] Kernforschungszentrum Karlsruhe GmbH: "Kraft-Momenten-Sensor". Patentschrift DE 4101732 C2, 1994.

[6] Office national d'études et de recherches aérospatiales (ONERA): "Poigneta detection de six composantes d'effort". FR 82 11181, 1983.

[7] Technische Universitat Ilmenau: "Vorrichtung zur simultanen Erfassung von Kraft- und Momentenkomponenten", Patentschrift  DE10 2011 106 894 B3, 2012.


bars-filter